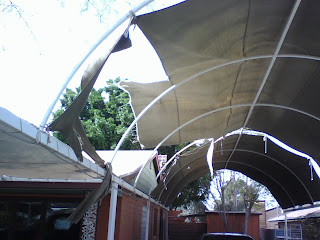
Well, the winds are gone…and so is half of our carport tarp. As I mentioned in my last post the high winds on sunday really did a number on our carport. Here are some better photos of the destruction in action:
Continue reading →
diy
07
Mar 08
So the winds are gone…
05
Mar 08
Overbrew! brewverflow?
Overbrew! brewverflow?
Posting form my phone is a little annoying – but it’s better than nothing. The text above was all I sent – but I had to remove 3 paragraphs of drivel that Verizon felt they needed to add. And of course being a phone it’s hard to enter much of a message.
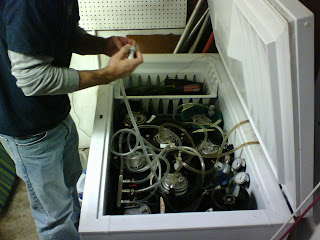
The cause for such spur the moment updating however is our critical capacity on homebrew. The Yuma Brewers have been busy this year even if we haven’t been updating our old blog! Matt’s fridge is at capacity – plus J has some kegs at his house in his new converted freezer. Mark found us a pile of new kegs and Rich just got a used fridge for $10. And don’t forget my own cooler project.
Matts freezer/fridge above is holding 7 kegs and a 20lb CO2 bottle, we could move the CO2 out to make room for one more keg…but he’s basically at capacity. We did finish one of those last Wednesday, and one will be coming over here tomorrow for my birthday party. Thanks to Tommy we’ll also be tapping tomorrows beer with Nitrogen which will be an exciting experiment. But we’ve got more waiting to go into kegs so it’s a good thing more homes for them are becoming available!
02
Mar 08
Wind sucks today
Better photos to follow later but I wanted to test posting from my phone. As the title says the wind here sucks today. The front half of our carport tarp has been destroyed…it’s actually gotten worse since I snapped this photo and is now torn all the way to the very top – right through the double stitched anti-rip sections 🙁
I kind of knew it was going to happen. I was never very happy with the choice of material the previous owner used for the carport, he claims it was UV rated but it’s only a few years old and already it’s badly faded and I could tell it was getting weak. In fact just yesterday I was looking at some tears that had started around the grommets in it so I knew it wouldn’t be lasting forever.
I’d like to go out and take it down before it gets any worse…but with 45MPH gusts predicted (Though I think they’re bigger based on how much our trees are swaying!) I don’t think it would be a wise idea for me to go outside and play with a large sail in high winds on top of a ladder. Since it’s a total loss at this point anyway I’ll just let the wind have it’s way and start thinking about how to deal with it.
I’d love to make something that could be rolled back for occasions where we want some sun…or when the wind gets like this 😀 But for now I’m just hoping we can find something we can afford as a replacement. I’m hoping my old boss Gwyn at Racecraft can help me get some vinyl impregnated awning fabric like she uses and help me sew it up to be the right size. Going to have to make some phone calls this week it looks like!
01
Mar 08
Crazy project update (Take 2)
Hmmm, didn’t get any images with that. Apparently Picasa’s blogging features still have some issues even if you stick to their <=4 images rule. So here goes again:
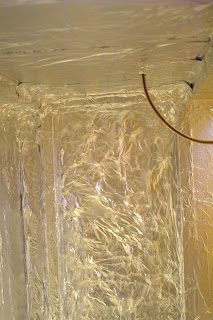
Well, with my dad posting his much anticipated big reveal – I figure it’s time for me go to the other direction and post an incremental update on my latest crazy project. Namely the conversion of our back cabinet into a beer/whine fridge. When I last blogged about this I left the insulation specifics somewhat up in the air. Since then I’ve spoken to our resident refrigeration expert and decided on my final plan of attack (Well for everything except the doors. The first layer will be aluminum foil to act as a reflective heat barrier and somewhat as a moisture barrier. After that will be a layer of plastic to make sure I’ve got a good external moisture barrier. I’ve been working on layer one since before my last post about this, but it was just today that I finished it:
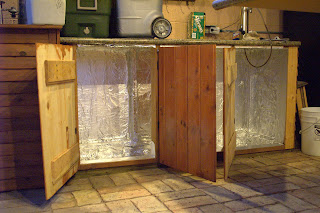
While I do expect the aluminum to help as a moisture barrier…I didn’t go crazy making sure it was 100% airtight since I still have the plastic layer (and a few other layers) coming. I did use 3M Super 77 spray glue to bond the aluminum to the walls and itself so even where it appears there are gaps usually there’s a layer underneath and it is all sealed at some point. Lines for more serving taps will require more holes in the future…but for now I just want to keep the holes as small as possible even though my tap is insulated inside.
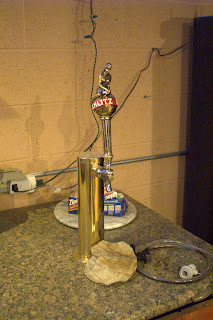
Oh yeah, I also picked up some Brasso and cleaned the tap tower back up again. It had gotten real nasty looking living outside as long as it had without being cleaned. And I picked up some vintage tap handles cheap on ebay…well most were cheap. This one I paid a bit much for..but I just had to have it to go with my Schlitz ball and in memory of many a happily wasted evening at the union. Goes rather nice with the brass tower I think!
So layer one is finished. Tomorrow I’ll try and do layer 2 – the plastic moisture barrier. Once that’s up layers 3 and 4 should go quick and easy since I have them on hand…but just what they are I think I’ll leave up to the imagination for now.
24
Feb 08
Nefarious skills put to positive use
Amy and I have known it was coming. From the day we moved in we dreaded it but we knew it was unavoidable…sooner or later we were going to lock ourselves out of the house. The issue is the style of lock. On the house we were renting they were pop-locks where they would unlock anytime you opened them from the inside. On this house they’re twist locks that stay the way they were last set. So whereas before we knew that the act of stepping out of the house would unlock it – now if we step out while it’s locked it stays locked.
18
Feb 08
More painting
Ok, the cell phone didn’t do a very good job earlier…and now I know that even a good camera isn’t going to make this very easy. Until I dig out one of my grey cards It’s going to be up to you to use your imagination as to how our living room looks. Despite knowing the temperature of our light bulbs (I’ve put warm 2800k CFL’s into almost every fixture, the fan lights are off since they don’t match) I still had a hard time getting the white ballance correct on my camera…and the JPG conversion – I need to find time to process the RAW’s to get these colors accurate. The first one is closest to reality – though the red isn’t really that intense. Even so we’ve decided on a replacement that is more in line with the existing green wall and this new blue.
BTW – when I worked in a one hour photo lab I used to HATE people who would bring in photos like this. If you never saw the scene it’s real hard to tell what the color should be like! The only mainipulation on these photos was done entirely in-camera. The poor camera in this case is faced with the same issues I had to deal with manually choosing color corrections for a roll of film that I had no baseline for. It’s a lot easier to fix now with photoshop than it was with heavy correction filters and multiple attempts (each wasting paper and chemicals) but it’s still tough to make the final call.
When we get the new red and re-paint I’ll take some better full living room shots to show off the changes. No photos of the 3rd bedroom yet…I dug in yesterday before Amy got home and with about 4 hours spent between the two of us it’s starting to take form. Still a mostly disorganized pile of boxes…but it’s about half as big of a pile as it was before! There are also 3 bookcases and 2 desks setup already.
I also have a project in the backyard that I’m working on. That will have to wait for another post. I’m experimenting with using Picasa to ease including photos…but I’m not big on it yet. I recently had to move my hitesman.com domain from the provier it had been with for over a decade to one of the servers I administrate for MGM Internet Solutions. I’ve been meaning to do it for some time and an e-mail issue finally gave me the excuse to pull the plug. Now I have much more control over my domain and will be able to persue some other ideas with it again. But until then it’s looking like Picassa is ok for using one or two photos…but add more than that and they may not come through. It’s also easy to mess up the alignment and the generated HTML is pretty gnarly (I need to cut and paste into my editor to see if some hilighting will make it more tolerable to read.) The backyard project will have quite a few photos and I don’t want to break it into THAT many posts…
18
Feb 08
Latest Crazy Project
I had taken a pano of the backyard before the party started…but I’ve been having some serious exposure issues with my camera lately and need to setup to tests to see if I’m crazy or if the camera is. It may just be that the dynamic range in my yard is way too much for the D7…I have a feeling it may be a lens issue though. Reminds me of a previous issue I had with one of my cameras…but that’s a whole different story. Maybe if I find my old film cameras while organizing the house I’ll talk about it. But it’s not the story for today the point right now is either I’ve completely forgotten how to meter a scene…or my camera isn’t really doing what it says it’s doing. Don’t rule out me completely forgetting about some setting I forgot I had changed in some special situation and just need to change back. This one frame from that series though showed a good “party mode” before photo of our designated bar. Here’s a little less “formal” (though the tap has now been polished) day to day view of it as I prepare to embark on my latest experiment:
The tap when up hours before the party after a few days of debating where it should go. With the tap in place the question became of course…how to keep the beer cold. For now we’re just using a bucket of ice with the 5gal homebrew keg sitting in it. It works…but I can’t leave the beer in place and have to move it to the fridge at the end of a party. But we do use that fridge for some things so having the beer take up space isn’t a permanant solution. I also don’t want to drill a hole (it’s a nice fridge), use the ice water inlet or any other modifications to the fridge.
So I figured why not use the space under the tap! This space isn’t used for much of anything right now other than as a bar at parties and storing coolers. The area on the left with the red grill on top does not open, it is open to the left side. The power outlet available just above the counter is shared with the fridge. I found what I believe to be a gas line capped off inside the cabinet under one of the temporary “floors” that the previous owner had set in it. The fridge seldom runs right now in the winter. I had a fridge in a Yuma garage and have several friends with outdoor or garage fridges, freezers and freezers converted into fridges. I have an idea what to expect if I’m going to turn this cabinet into something truely usefull for us.
I figured Amy would never go for it – but when I offered to build a wine rack into 1/3rd of the cabinet she becam very supportive! I did find some inspiration and potential validation that my idea could work and is worth pursuing. I figure as a first step I can just turn the cabinet into a large cooler and see how long it will keep a 5 gallon bucket of ice. Won’t cost too much and will still make it more useful. The space available is only 46 cubic feet – and it will probably be less since I’m planning an inch or two of insulation on top of the studs.
The construction of the existing cabinet is pretty good. It’s all at least as square as I could get it, pressure treated lumber was used for the ground contact and it’s on a nice flat slab (with water, gas and drain available). As well as being on a slab it’s up against a large brick wall. I’m not sure if this thermal mass behind and under it will help me or hurt me…this part of the wall is pretty much in constant shade and seems to stay consistently cool. But I haven’t been here for a summer yet and Yuma summers are INTENSE so there’s a good chance that all that thermal mass could work against me if the sun gets near it. The hole for the tap is very small. I will be enlarging it at some point so I can upgrade to a 3 or 4 tap tower – but that’s way down the road unless I find a screaming deal. The west wall (Left in the overview photos) is a solid board much like the north wall seen on the left here. The east wall is just slats however. The south wall (my worst for sun exposure) is the doors.
I’m going with a multiple layer approach to insulation to try and help deal with the extreme yuma summer temperatures. The first step is about half done. I also have supplies for the second and third layers. So far I have less invested than it cost for us to go bowling last Saturday but the big budget item will be a way of keeping this box cold once it’s insulated. I have some ideas there…but like the details on insulation they’ll have to wait for another day.
12
Feb 08
Darkroom take 2
Well, I still haven’t found a way to make linking to my own images any easier on here, but I have some more recent events I’d like to blog about before they’re old news. So I figure I better wrap up the darkroom post.
I left out a kind of interesting little bit of the story last time. You see, I only budgeted for the inside of the darkroom and planned on leaving the studs exposed outside. I bought spray foam to fill in the cracks and make sure the room was light tight even with only one layer of drywall. My dad was not very happy about that, but did agree to buy the drywall for the outside as long as I would put it up. We also went ahead and added some outside outlets and in the one upper corner – speaker connectors for the radio I planned on putting in the darkroom.
I did work a few other special features into it as well at that point. First I added some ventilation into the walls. I built baffles out of cut down 2×4’s between the studs so there was no path for light to follow. The baffle on one side was static, while on the other side I installed a large muffin fan to circulate air. I also wired in a doorbell with buttons both right outside my door and up in the kitchen so my parents could contact me without having to come downstairs. The lights were wired on two switches – dark lights at the normal height and white lights higher on the wall so they wouldn’t be hit accidentally.
At first my equipment was pretty sparse:
The enlarger I bought new, it was a real challenge to do quality work on it. I bought a decent lens (spent more on that than I did on the enlarger) but the Besler Cadet was cheaply built and not very stable. The table it sits on I built myself using the top of an old computer desk we had – but making my own legs to raise it to an easier work height when I was standing (or sitting on the bar stool from a relatives old bar.)
Wet side features include the large white cabinets from my great grandmother, I built a paper safe into the largest drawer. As well as a kitchen cabinet that came with the house, I just had to add the top to it. The laundry tub I also plumbed in though it had originally been in use elsewhere in the basement – I just claimed it and gave it a better home. On top of the stereo is a clock I got at a hamfest dirt cheap and ended up housing in an old piece of tupperware. It was just the right wavelength and would not fog paper so it worked great for me.
But the trays on the counter were only a temporary solution while I built my sink. The sink was made out of 3×4″ OSB then sealed with multiple coats of outdoor paint and clear acrylic. Eventually it started to rot out around the drain…but it did last a long time before that happened:
I also put some pegboard up and acquired more and more darkroom equipment. As well as some other little toys that I kept around as moral boosters 😀 I didn’t save up enough to add a ceiling for some time…but when I did it made a big difference. Much less dust and the white surface made the safe lights more effective. I know painting a darkroom black is usually done to prevent stray reflections…but I always preferred keeping the walls and ceiling light so the little light there was would be more useful. And once I got into doing color work which necessitated working without any lights….I just didn’t see much point to taking everything out so I could paint.
The Vivitar enlarger I got at a used equipment shop in Columbus cheap after trading in my grandfathers antique enlarger that I never used. (it was a Kodak and I don’t have any photos of it that I know of.) It was a step up from the Cadet…but just barely. You can also see my helper handle hanging off the side of the table. I built a moveable shelf off the side of the table so I could do very big enlargements (the short height of the Cadet was one of it’s big limiting factors!) but couldn’t reach the focus knob…the helper was my solution to that problem!
Over in the other direction you can see one of the air vents and the radio. I removed all of the lights in the radio, then put a small red safe light bulb into the Schlitz sign hanging on the pegboard which I plugged into a switched outlet on the back of the stereo (meant for a tape deck or turntable.) I kept the top of the Schlitz sign unscrewed so it was easy to reach in and unscrew the blub when I did color work. The St. Pauli Girl banner still hangs in my kitchen to this day, though I really can’t stand their beer!
I collected a few more cheap enlargers at garage sales and such and ended up eventually traded them in along with some cash for a Durst color enlarger. It was 35mm only but I really wanted that color head so I could get rid of my VC filters and eventually learn color. Sure enough eventually I ended up buying a Jobo tube processor and teaching myself color printing. While I was in college my mom ended up burning out the power supply on my Durst – so she bought me a new one as a replacement. I think she eventually got the old power supply fixed and kept the original enlarger…but by that point I was using the darkroom so little that it’s hard for me to remember.
The Durst and Jobo are still with me, patiently awaiting the day I have the time and space to setup a darkroom again. While I shoot almost exclusively digital now I do miss the days of the darkroom and would very much like to do some B&W film and paper work again at some point. The new house has a bathroom with no windows as well as a laundry room with no windows…so the chances of me doing something are pretty good.
Oh yeah, that reminds me. Photos of the new living room paint are coming…it’s just real hard to get a shot that shows the colors well. I need to remember to take it before the sun gets too high in the sky to get under our awnings and into the living room!
10
Feb 08
My darkroom
Well, since it was my dad mentioning my old darkroom that spurred me into finally creating a blog I suppose it would be a decent place to start from. I built my darkroom in … I believe it was the summer of 1988.
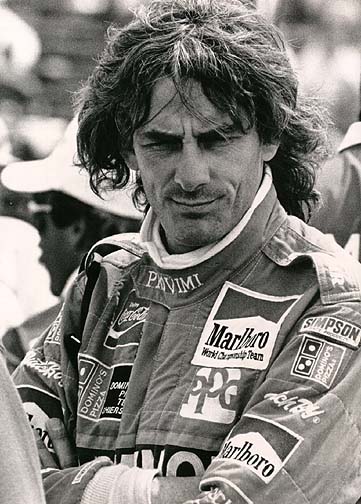
Correction. It must have been 1990 as it appears that was the year that Danny Sullivan won the Cleveland Grand Prix. The film I shot there (while my dad was rushed to the hospital for an emergency appendectomy) was the first I developed after getting my enlarger. One of the first shots I printed was of Danny Sullivan just before the race when I happened to get a few frames of him. I’ll have to try and dig those up and scan them sometime. The one shot I liked best from that weekend has been on my website for about as long as I’ve had a website and was of Arie Luyendyke, who got 5th in the CART race but went on to take 1st at the Indy 500 that year.
My dad helped a lot more than he lets on in helping me with the darkroom. He may not have been able to physically help with erecting the walls, sweating the plumbing fittings, wiring the room or even the drywall at the time I built it. But he had helped me plan the project and more importantly had involved me in enough projects before that I already had first hand experience with most of the skills I needed. The one part of the job the could have helped with but didn’t was the original cleanup. That was the price I had to pay for building in his basement – it was up to me to make room and keep the darkroom area cleaner that it was before I started.
These first shots were after I had already cleaned out most of the corner to try and help convince my dad that I was serious.
Once I had the OK and had bought the first load of lumber I cleaned the corner out completely and started to build:
Going to look into better ways of linking my photos (better as in easier for me when posting!) then come back and post the inside shots along with some of it a little later after being in steady use for awhile.
